
Christmas nails are back in full color, from deep cherry polish and tiny gold stars to snowy whites, evergreen branches, and cheerful little snowmen.
This collection of Christmas nail designs moves from polished and classy nails to full-on sparkly nails, so there is a look for every holiday mood.
Some ideas are simple enough for a quick home manicure, while others are packed with hand-painted details, gems, glitter, and tiny seasonal characters.
Save your favorites now, then match your festive manicure to your Christmas sweater, party dress, wrapping paper, or even the tree decorations.
1. The Little Christmas Storybook Set

This first manicure feels like a whole Christmas morning told across ten tiny nails. It mixes red glitter, soft nude polish, a smiling snowman, a red-nosed reindeer, ornaments, a Christmas tree, snowflakes, bows, and gold details without losing its cheerful balance. The nude base keeps the busy artwork from looking too heavy, while the red and green pieces bring that classic holiday color story straight to the fingertips. One nail has a jolly snowman with a striped scarf, another wears a tiny reindeer face, and the ornament nails look almost like miniature decorations hanging from a tree. It is playful, nostalgic, and honestly hard not to smile at.
The best part is that every nail has its own little surprise. The red glitter nails act as strong accent nails, giving the design sparkle from a distance. Fine gold lines look like ribbon curling around a present, and small white dots create the feel of falling snow. If you want the full look, ask your nail artist to work in layers instead of trying to paint every detail at once. A nude or sheer pink base should come first, followed by the larger shapes, then the tiny faces, berries, stars, and dots.
Helpful ideas for this design:
• Use a milky nude base so the artwork feels soft rather than crowded.
• Keep the snowman and reindeer on two feature nails only; too many faces can make the set look messy.
• Add raised gel or tiny studs to ornaments for a fun 3D touch.
• Finish with a thick, glossy top coat, but avoid brushing over large charms too heavily.
This is one of the most festive manicure choices in the collection, perfect for someone who wants their nails to be part of the conversation. It also works well on short nails if the artist simplifies the faces and uses larger, cleaner shapes. The only issue is maintenance: tiny details may chip sooner than plain polish, especially around the tips. Carrying a small top coat for touch-ups can help. For a slightly more grown-up version, swap the bright green for forest green and use gold instead of white for the snowflakes. The result still feels merry, just a little more polished.
Image Credit: bushrabibikhan
❝Christmas nail designs can tell a whole holiday story when each nail gets one tiny detail. Start with a soft nude base, then layer red, green, gold, and cheerful characters so the finished set feels festive, balanced, and ready to share.
2. Ruby Red Starry Night Nails
Find my red sweater on Amazon →
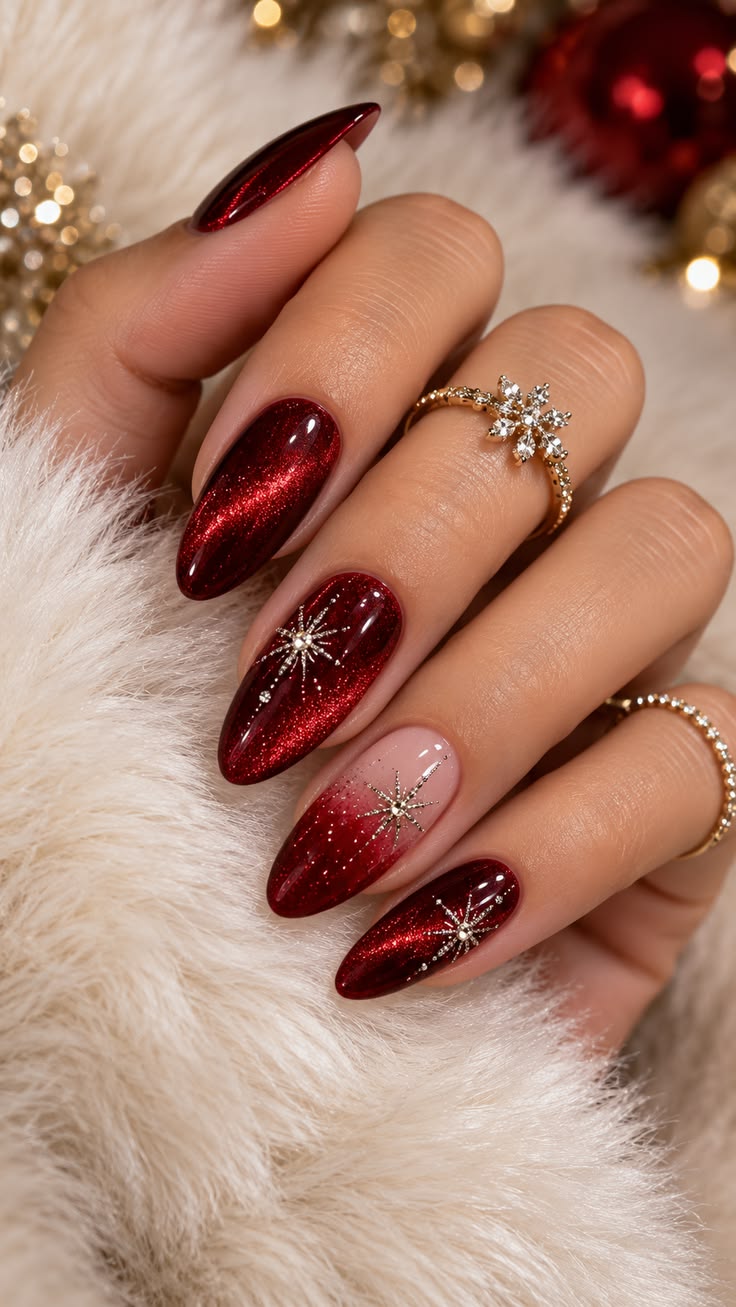
Deep ruby red makes these nails feel rich, warm, and ready for a holiday party. The magnetic cat-eye finish creates a glowing stripe through each almond-shaped nail, almost like candlelight caught inside the polish. Tiny gold and silver starbursts sit on top of the red shimmer, adding just enough decoration without taking over the whole set. One soft nude accent nail fades into the burgundy shade, which gives the manicure a little breathing room and makes the sparkle stand out even more.
This is a lovely choice for anyone who wants sparkly nails but does not want cartoon characters or bright green details. The color looks especially beautiful against cream knitwear, black velvet, or a simple red dress. Because the stars are small and spaced out, the design still feels elegant at a family dinner or office party. The almond shape lengthens the fingers, though a short oval shape would also carry the look nicely.
To get the glowing effect, use a magnetic gel polish or cat-eye lacquer over a dark red base. Hold the magnet close to the wet polish for several seconds, then cure each nail before moving on. A common mistake is waving the magnet too far away, which creates a weak stripe. Another is adding too many charms; the beauty of this design comes from the open space between the stars.
Simple tips for making it last:
• Cap the free edge with polish and top coat to protect the red shimmer.
• Place stars slightly off-center so the set looks more natural and less stamped.
• Use a fine liner brush for star points if you are skipping decals.
• Add a sheer nude shimmer accent instead of a solid nude nail for a softer blend.
The gold ring shown with the manicure makes the whole look feel even more dressed up, but the nails do not depend on jewelry to shine. They already have a strong glow under warm lights. If your skin tone leans cool, choose a berry-red cat-eye. For warmer undertones, a wine or garnet shade will look beautiful. This design is also more forgiving than pale polish because small chips are less obvious. It is a classy nails option with a little holiday drama, and it photographs wonderfully when the light hits the magnetic stripe.
Image Credit: Hello_BeautyBloom
3. Icy Candy-Cane Ribbon Tips
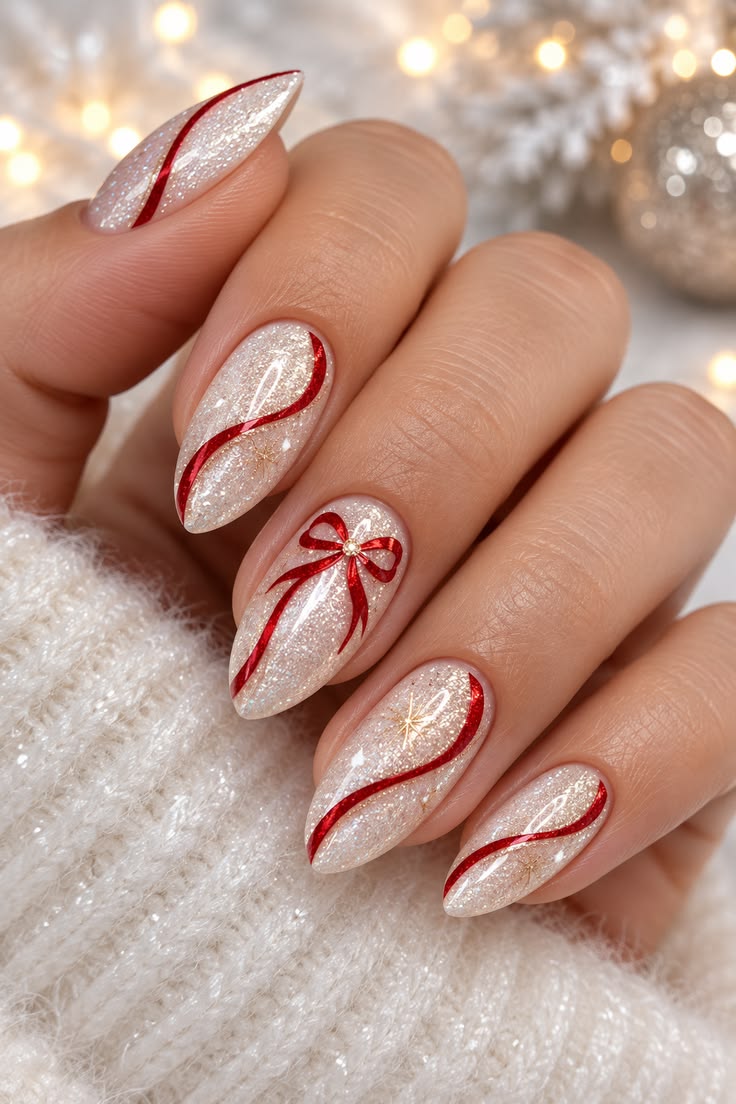
These nails turn the classic candy cane into a soft, elegant ribbon that winds across a snowy white base. Each nail is covered in fine white shimmer, then traced with a slim red curve that bends from the tip toward the center. The red lines are clean and glossy, so they look more like curled holiday ribbon than a loud striped candy cane. A few nails feature tiny gold bows or star details, giving the whole set a wrapped-present feeling.
The almond shape works perfectly here because the long, curved nail gives the ribbon room to move. On shorter nails, the design can be adjusted into one sweeping diagonal stripe instead of a full spiral. The milky glitter base is what keeps the red from feeling too strong. It looks like fresh snow under Christmas lights, and the fine sparkle catches movement without becoming chunky. This is a polished festive manicure for someone who likes seasonal details in a neat, wearable way.
For the cleanest result, start with two thin coats of sheer white or pearl polish. Let the base dry fully before adding the red ribbon. A striping brush with very little polish on it will create a smoother line than a brush loaded with product. Try drawing the curve in one slow motion, but do not worry if it is not identical on every nail. Slight differences make the set look hand-painted and softer.
Ways to personalize the look:
• Replace bright red with burgundy for a more elegant winter party style.
• Add a tiny gold bead at the center of one bow.
• Use silver glitter instead of gold for a cooler snow-day effect.
• Keep one or two nails plain pearl white so the ribbons have room to shine.
The biggest issue with this design is line thickness. If the red stripe is too wide, it can hide the snowy base and make the nail look shorter. If it is too thin, it may disappear under the top coat. Two fine layers are better than one thick line. A glossy top coat will smooth the glitter and help the ribbon look polished. This design is also a nice choice for holiday travel because it matches nearly everything, from a red sweater to a silver party dress. It feels festive without being tied to one particular Christmas character, which means you can wear it happily through the whole winter season.
Image Credit: Hello_BeautyBloom
4. Evergreen and Gold Minimalism
Find my gold sweater on Amazon →
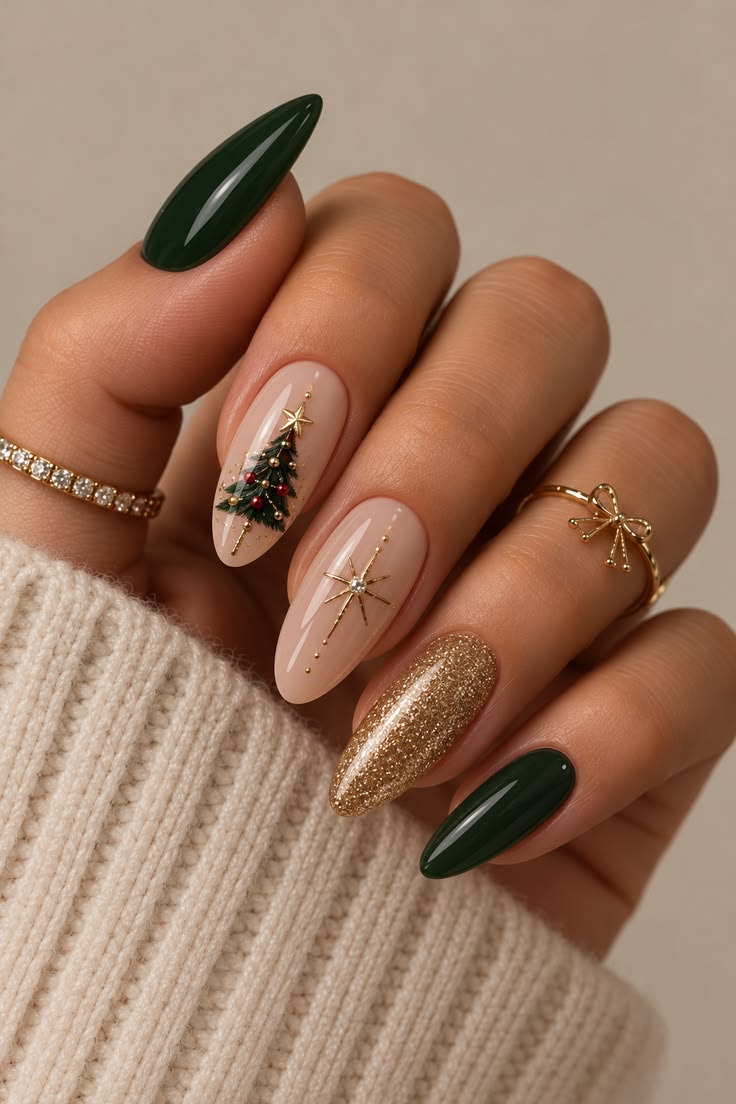
For a quieter Christmas look, this forest green and gold manicure is hard to beat. Most nails are painted in a rich evergreen shade with a smooth glossy finish, while the nude accent nails carry tiny Christmas trees and fine gold starbursts. One gold glitter nail brings a warm flash of sparkle, stopping the set from feeling too plain. The colors remind you of pine branches, candlelight, and gold ornaments without using a single traditional red nail.
This is one of the easiest designs to wear with everyday outfits. Forest green looks beautiful with cream sweaters, camel coats, denim, and black clothing, so the manicure does not feel limited to one holiday event. The nude base also lets the natural nail show through, creating a clean and classy nails effect. The little tree is narrow and simple, almost like a line drawing, while the gold star adds a tiny point of light above it.
A nail artist can create the tree with three small green brush strokes or a slim triangular outline. It does not need to be perfectly detailed. In fact, too many branches or ornaments could make the accent nail look crowded. A few gold dots, a red micro bead, or one tiny rhinestone is enough. The gold glitter nail should be fine and dense rather than chunky, because a smooth surface keeps the manicure feeling refined.
Try these small changes:
• Use olive green for a softer, vintage holiday mood.
• Switch the nude base to a sheer blush pink for a more feminine finish.
• Add one red ornament dot to each tiny tree.
• Choose a matte green nail with glossy gold art for a modern contrast.
This design is friendly to shorter nails because the artwork is small and vertical. It can also last well since most of the set is solid color. The main thing to watch is staining from dark green polish. Apply a good base coat first, especially if your nails are naturally pale. When removing the color, do not scrub harshly; wrap the nail with remover for a minute instead. The final look is festive but not loud, with just enough gold to catch the light. It is a lovely choice for people who want Christmas nail designs that feel grown-up, calm, and quietly special.
Image Credit: xlaxkx
5. Garnet Cat-Eye with Tiny Golden Stars
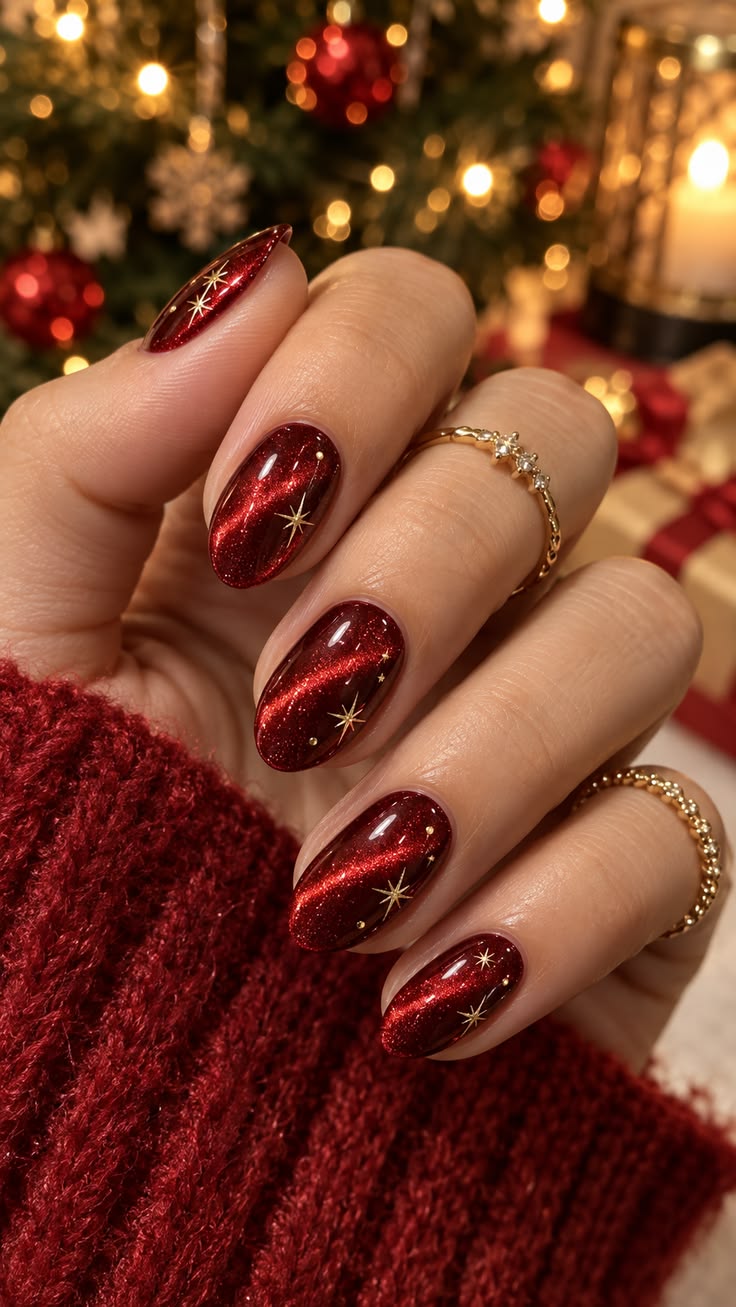
This manicure is all about the glow. Every nail is coated in a dark garnet magnetic polish that shifts between red, wine, and bright ruby when the hand moves. Small gold stars are scattered across the surface like a clear winter sky, and the simple decoration lets the rich color do most of the work. The result is dramatic, but the short rounded shape keeps it practical and easy to wear.
Unlike a chunky glitter polish, cat-eye color has a smooth, almost glass-like shine. It catches the Christmas lights in a narrow beam, so the nails look different from every angle. That makes this a smart pick for someone who wants sparkly nails without rough texture. The little stars add holiday meaning while staying neat enough for an office, dinner, or holiday photos.
The polish needs a little care during application. Apply a dark red or black-red base first if the magnetic shade is sheer. Then brush on one nail at a time, hold the magnet over the wet polish, and cure quickly once the glow looks strong. If you wait too long, the magnetic particles can spread and the stripe may lose its shape. A glossy top coat will make the garnet color look deeper, but use one that does not shrink around the edges.
Application notes worth saving:
• Keep the magnet close, but do not touch the wet polish.
• Turn the magnet in different directions for varied light stripes.
• Place the stars near the sidewall or lower third for a scattered sky effect.
• Use flat decals if you dislike the feel of raised nail art.
The deep red tone works across many skin tones because it has both berry and brown notes. If you want a brighter holiday result, choose ruby red. If you prefer a moody winter feel, choose black cherry. The stars can be gold, silver, or even rose gold to match your jewelry. One small caution: magnetic polish may show dents more clearly than cream polish, so avoid rushing through prep. Smooth the nail plate and keep the layers thin. This is a simple, classy nails idea that still gives off plenty of Christmas sparkle when the lights go down.
Image Credit: jasminjonss
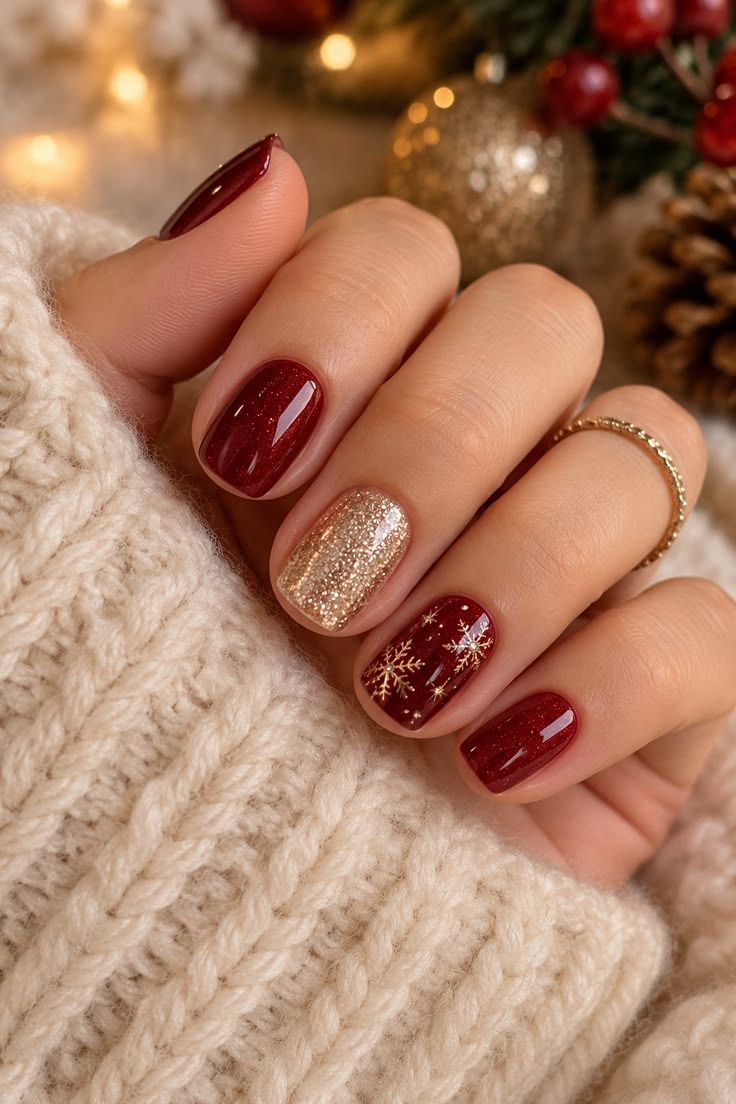
6. Burgundy, Gold Glitter, and Snowflake Details
Find my burgundy sweater on Amazon →
Burgundy and gold make a dependable holiday pair, and this manicure shows why. Most nails wear a dark wine-red polish with a soft shimmer, while one nail is packed with warm gold glitter and another carries delicate gold snowflakes. The mix feels cozy and elegant at the same time, like a velvet dress beside a glowing Christmas tree. It is festive enough for a party but simple enough for daily wear.
The short square shape gives the design a neat, tidy look. That shape is useful if you type, wrap gifts, or prefer nails that do not catch on sweaters. The gold glitter accent brings brightness to the darker polish, and the snowflake nail adds a little artwork without making all ten nails busy. A few tiny dots and stars around the snowflake help fill the space, but the design still leaves plenty of burgundy showing through.
For home application, paint the burgundy nails first and let them dry before working on the glitter. A dense glitter polish can be brushed on in two coats, or dabbed with a makeup sponge for more coverage. Just remember to protect the skin around the nail because glitter likes to travel. For gold snowflakes, decals are completely fine. If you are using a liner brush, make six thin arms first, then add small branches to each arm. The snowflake does not need to be perfectly even to look pretty.
Useful ways to adjust it:
• Add a matte top coat to the burgundy nails and leave the glitter glossy.
• Swap gold for silver if your holiday decorations are cool-toned.
• Use champagne glitter for a softer, less yellow finish.
• Put the snowflake on the middle finger so it shows clearly in photos.
The design can be made on almost any nail length. On very short nails, use one tiny snowflake rather than several overlapping ones. On long almond nails, you can add a second snowflake or a fine gold border. The only tricky part is glitter removal. Soak cotton in remover, wrap each nail with foil for a few minutes, and slide the glitter away instead of scrubbing. These Christmas nail designs give a rich seasonal feeling without relying on bright colors. They are a safe choice when you want classy nails with a bit of shine and a warm, traditional palette.
Image Credit: SturningStyle
7. Burgundy Negative Space Holiday Mix

Find my burgundy sweater on Amazon →
This set uses negative space in a very pretty way. Deep burgundy covers the tips and a few full nails, while sheer nude sections keep the manicure light and modern. Fine gold lines curve around a starburst, a snowflake, and a tiny gift-bow design, making the decoration feel more like jewelry than painted cartoons. The contrast between dark wine polish and bare-looking pink sections gives the long almond nails a graceful, lengthening effect.
The design is especially nice for someone who likes Christmas nail art but wants to keep it polished. There are clear holiday clues, yet nothing feels overly cute or loud. The burgundy tip on the nude nail works like a French manicure with a seasonal twist, and the gold outline adds a small flash when the hand moves. Because some of the natural nail remains visible, the set may also grow out more softly than a full dark polish manicure.
Clean prep matters a lot here. Any uneven cuticle line will show beside the sheer base, so gently push back the cuticles and use a thin layer of nude builder gel or pink polish to smooth the nail. For the burgundy sections, use French-tip guides if you want a sharp edge. Gold striping tape can create crisp lines, but a fine brush gives a softer, hand-drawn finish. Place the snowflake slightly to one side rather than directly in the center for a more fashion-forward look.
Small styling choices can change the mood:
• Use cherry red for a brighter, playful manicure.
• Choose black cherry and antique gold for a richer evening look.
• Add one tiny crystal to the center of the starburst.
• Keep the negative-space nails sheer instead of fully nude for a glassy effect.
This look suits almond and coffin shapes best, although a rounded short nail can use a smaller burgundy tip. One issue is that sheer polish can show streaks. Thin layers and a soft pink base usually solve that problem. Another concern is gold striping that lifts at the edges; seal it carefully with top coat and avoid placing tape too close to the sidewall. The finished manicure feels like a holiday version of delicate jewelry: dark, shiny, and quietly festive. It is a strong pick for classy nails at a winter wedding, cocktail party, or Christmas dinner.
Image Credit: xlaxkx
You might also like


8. Classic Tartan and Burgundy Stars

Find my tartan sweater on Amazon →
Nothing says cozy Christmas quite like tartan, and this manicure brings the pattern to the nails in deep green, burgundy, and gold. Several nails are covered in plaid lines, while the others stay solid burgundy with tiny gold stars. The pattern feels like a favorite holiday blanket or a ribbon tied around a present. It has a traditional look, but the glossy almond shape keeps it from feeling old-fashioned.
The secret to making plaid look neat is using only a few strong lines. The base can be forest green or burgundy, followed by thin red and gold stripes that cross at clean angles. There is no need to create every tiny thread from a real tartan pattern. A simplified version reads better on a small nail and is far easier to maintain. Keeping the star nails plain also gives the eyes a place to rest.
This design pairs beautifully with dark red sweaters, velvet skirts, and gold jewelry. It would also be fun for family photos because the colors show clearly even from a little distance. If you prefer a softer look, use cream instead of bright gold for the plaid lines. For a modern version, paint plaid on only two accent nails and use a glossy forest green on the rest.
Helpful plaid tips:
• Paint the lightest base color first and let it dry completely.
• Use a striping brush or nail-art pen with steady, even pressure.
• Make the vertical lines slightly wider than the horizontal ones for depth.
• Add gold only to a few stripes so the pattern does not become too shiny.
Plaid can reveal bumps quickly, so keep each line thin and allow it to dry before crossing another line over it. A thick top coat will smooth the surface and protect the artwork from sweater friction. If your nails are short, use one or two wide plaid bands rather than a full grid. The gold stars are an easy detail to paint with a dotting tool and a liner brush, or they can be added with decals. This is one of those Christmas nail designs that feels cheerful without being too flashy. It works for a winter cabin weekend, a holiday market trip, or simply drinking cocoa in your favorite knit sweater.
Image Credit: Trendyfashion715
9. Golden Ornament Garden
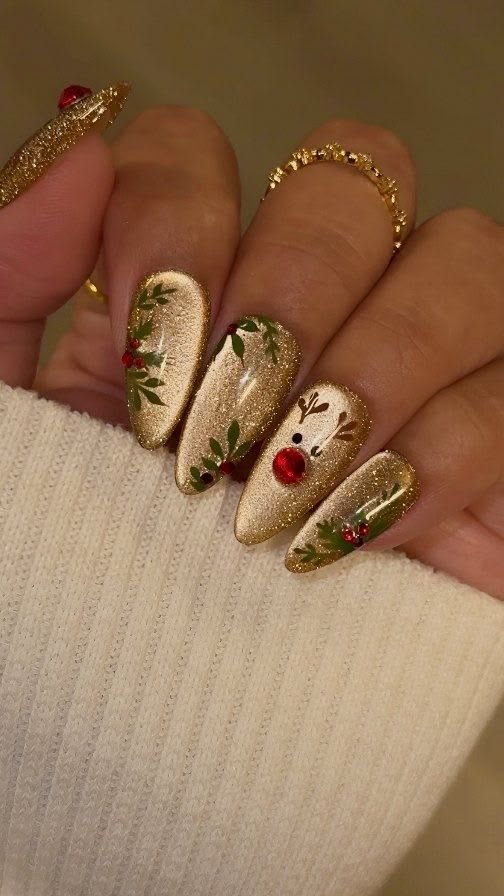
This manicure turns gold glitter into a glowing background for tiny holiday illustrations. Every nail has a sparkling champagne-gold finish, while small holly leaves, red berries, evergreen sprigs, and one sweet reindeer face are painted over the shimmer. The warm gold base makes the set look like antique ornaments under tree lights. It is bright and festive, but the muted greenery and red accents keep it from looking too neon or childish.
The almond shape gives the tiny botanical details room to stretch upward. On the holly nails, green leaves sit near the tip with small red berry dots tucked beside them. The reindeer nail adds a playful focal point, especially with its round nose and delicate antlers. Because the artwork is scattered instead of repeated exactly, the manicure feels handmade and personal. It would be beautiful with gold earrings, cream knitwear, or a champagne-colored party outfit.
Gold glitter can be tricky to paint over because the surface may be textured. Use a smooth glitter gel or add a thin layer of clear builder gel before applying the leaves. A fine brush works well for leaf shapes: paint two short curved strokes for each leaf, then add a thin center vein. For berries, a dotting tool makes round shapes quickly. The reindeer should stay simple, with a light cream face, tiny dark eyes, antlers, and a red nose.
Ways to keep the design balanced:
• Use green on only three or four nails and leave one or two pure gold.
• Match the red berry color to the reindeer nose.
• Add a tiny white highlight to the berries for a glossy ornament effect.
• Choose rose gold glitter if yellow gold is not your favorite.
This is a high-shine look, so it may feel more glamorous than a regular daytime manicure. If that is too much, use gold shimmer only at the tips and a nude base on the rest. Glitter removal will take patience, but foil wraps make the job much easier. Be careful with raised art as well; thick dots can catch on clothing. A smooth top coat helps. The final effect is warm, cheerful, and a little magical. These sparkly nails are made for candlelit dinners, holiday parties, and anyone who thinks a Christmas manicure should glow from across the room.
Image Credit: upscale_femininity
❝For Christmas nail designs that feel festive but grown-up, pair a champagne-gold glitter base with muted holly, berries, and evergreen details. Add one reindeer accent on almond nails for a playful finish that still looks polished under tree lights.
10. Red Snowflake and Holly Ribbon Glam

Find my red sweater on Amazon →
This manicure has the energy of a classic Christmas card, but the details are crisp enough to feel modern. Bright red nails carry white snowflakes and tiny gold stars, while nude accent nails show holly leaves, red berries, and curved red-and-gold ribbon lines. One full red glitter nail adds extra shine, creating a strong mix of color, sparkle, and clean graphic art. The almond shape makes each motif look long and elegant rather than crowded.
The white snowflakes pop beautifully against the red base. They are painted large enough to be seen clearly, with small dots around them that look like falling snow. The holly accents soften the design by adding green, while the gold ribbon ties all the colors together. It is a very festive manicure, but the pattern is arranged carefully, so the eye does not get lost.
For the best result, choose a true blue-based red or a rich cherry red with good coverage. Two thin coats usually look smoother than one heavy coat. Let the red cure completely before painting white snowflakes, since white polish can drag if the base is still soft. If freehand snowflakes feel difficult, use decals and seal them with a flexible top coat. Gold glitter lines can be painted with a very thin brush or placed with striping tape.
Ideas for customizing the set:
• Replace the white snowflakes with pale pink for a softer look.
• Use silver ribbon if you prefer an icy winter palette.
• Paint only the tips red on the nude nails for a French-style version.
• Add a single green holly accent instead of greenery on every decorated nail.
The design works best on medium to long nails, but short nails can use smaller snowflakes and one ribbon curve. Watch the edges of the glitter carefully because thick lines may lift near the tip. Cap the free edge with top coat and avoid soaking the nails for long periods. This style is for the person who wants their festive manicure to be noticed. It looks amazing in holiday photos, especially beside wrapped gifts or a decorated tree. If you love traditional Christmas colors but still want a little artistic twist, this red, white, green, and gold combination is a very safe bet.
Image Credit: GlossyGirlNails45
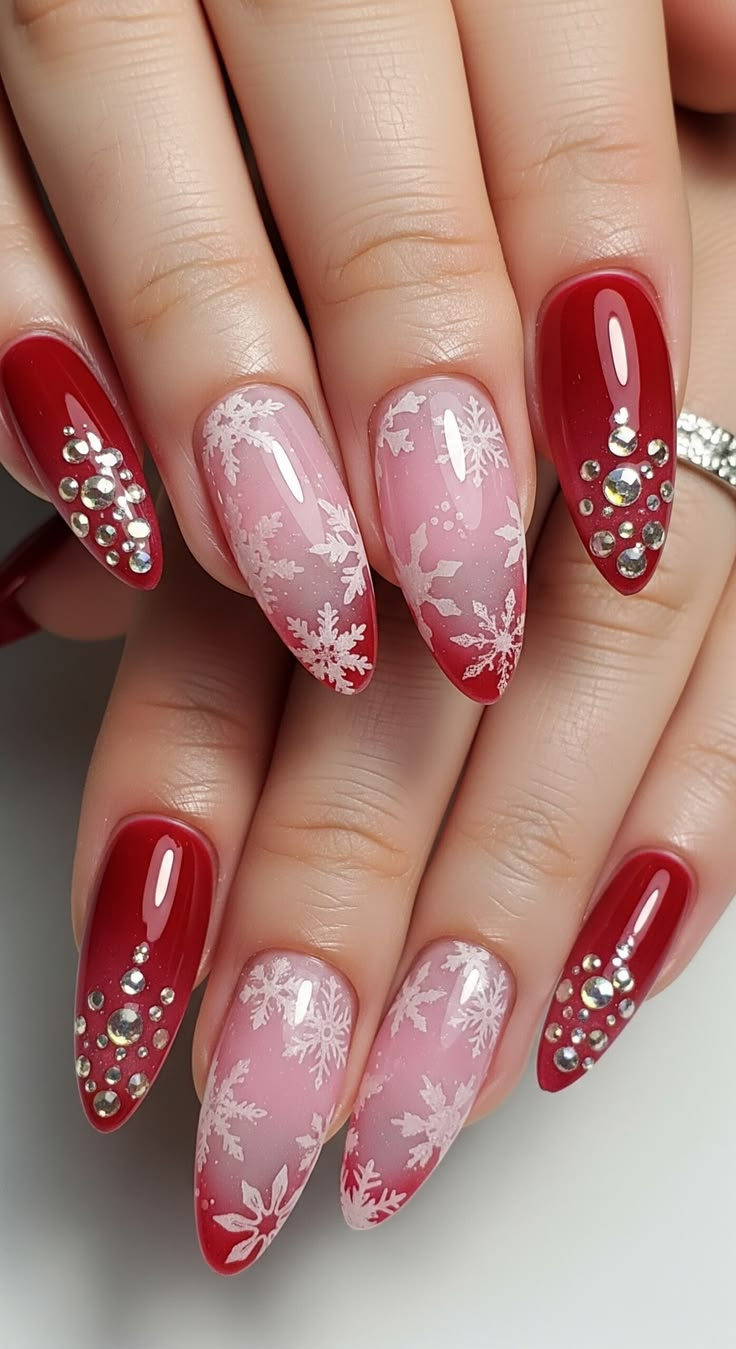
11. Blush Snowfall with Rhinestone Red Tips
Find my blush sweater on Amazon →
This manicure softens the usual Christmas red by pairing it with blush pink, white snowflakes, and crystal details. The nails fade from pale pink in the center to deep red at the tips, creating an ombré effect that looks like sunset over snow. White snowflakes are scattered across the lighter nails, while red accent nails sparkle with clusters of silver and clear rhinestones. It is girly, glamorous, and very bright under holiday lights.
The pink base gives the design a lighter feeling than a full red set. That makes it a good choice if you like Christmas nail art but usually wear soft colors. The red tips add enough contrast to make the manicure feel seasonal, and the crystals bring a little party sparkle. The snowflake shapes look almost frosted, especially when they overlap the blush ombré.
To create the gradient, use a makeup sponge with pale pink, white, and red polish, placing the darkest shade at the edge. Several thin dabs will look smoother than pressing on one thick layer. Clean the skin around the nail after each sponge layer, then add the snowflake details once the gradient is dry. Rhinestones should be placed with nail glue or thick gel, not regular polish, so they do not slide off during the first day.
Practical tips for this style:
• Choose flat-back crystals for a more comfortable everyday manicure.
• Keep the rhinestones near the side or tip instead of covering the whole nail.
• Use a pearly white shimmer beneath the pink for extra snowy depth.
• Finish around, not over, large crystals so they keep their sparkle.
The rhinestone nails may need more care than the painted snowflake nails. Gloves help when washing dishes, and you should avoid using the crystals as little tools. If one comes loose, remove it safely rather than pulling at the surrounding gel. The almond shape gives the ombré room to fade smoothly, though coffin or oval nails can also work. This is a strong option for New Year gatherings, Christmas parties, or anyone who wants sparkly nails with a soft pink twist. It feels festive without looking exactly like every red-and-green manicure on the holiday feed.
Image Credit: preview_crazyespresso_com
12. Midnight Evergreen with Rose-Gold Frost
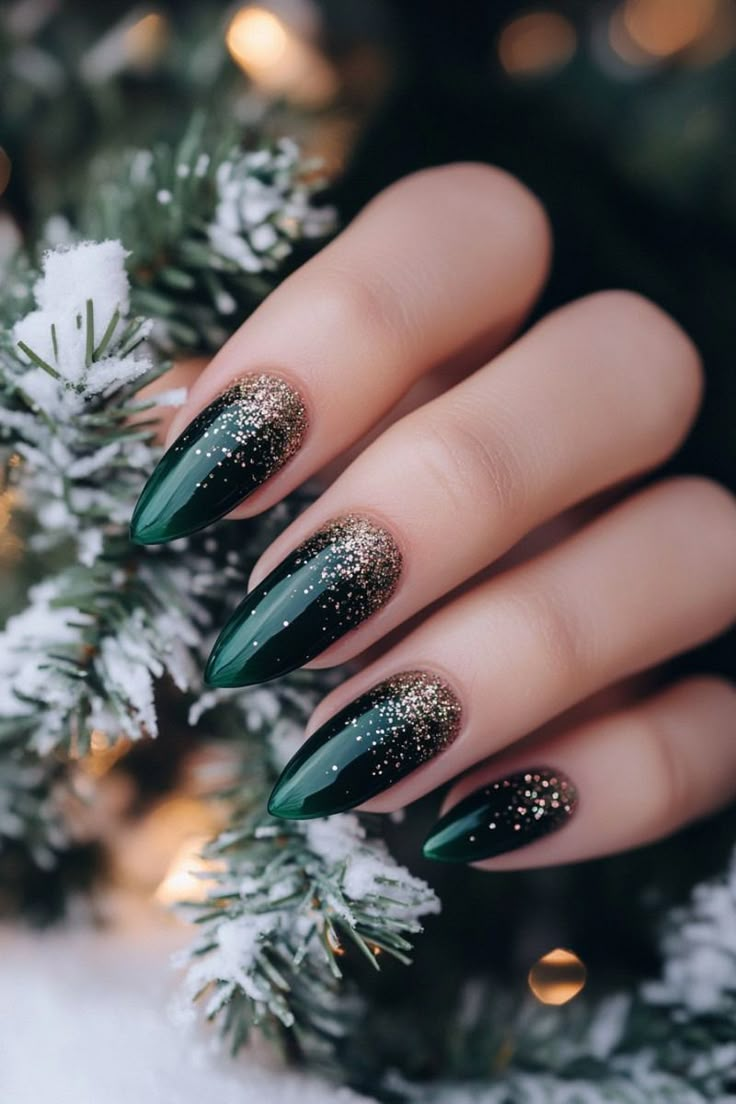
Dark teal green gives this manicure a cool, winter-night mood. The nails begin with a glossy green base that shifts almost black at the edges, while rose-gold glitter fades from the cuticle area toward the center. The sparkle looks like frost catching moonlight on evergreen branches. There are no large figures or busy patterns, just color, glow, and a little mystery.
This design feels different from the usual red Christmas manicure, which makes it a great choice for someone who likes a more modern palette. The deep green looks luxurious against pale knitwear and also pairs well with black, silver, cream, or gold clothes. Rose-gold glitter warms it up, so the nails do not feel too cold or dramatic. The pointed almond shape adds a sleek finish, but a short oval would make the style more practical.
A smooth gradient is the key detail. Start with the dark teal polish and let it cure. Then use a small sponge or soft brush to press rose-gold glitter near the cuticle, fading it gently toward the middle. Keep the tip mostly green so the shape stays clear. If you want more sparkle, add a fine glitter top coat rather than chunky pieces. A thick glossy top coat will level everything and make the dark color look almost like glass.
Try these variations:
• Use emerald green for a brighter tree-inspired look.
• Swap rose gold for silver glitter to create a frosty night effect.
• Add one tiny gold star to the ring finger.
• Choose velvet magnetic green polish for a soft, glowing texture.
Dark polish needs careful prep because every uneven edge can show. Clean the cuticle line with a small brush dipped in remover before curing. A base coat is also important because green pigments may stain natural nails. Glitter can be stubborn to remove, so use foil wraps rather than scrubbing. The result is one of the more classy nails options in this list, yet it still has enough shimmer to feel truly festive. It would suit a winter wedding, an evening party, or anyone who wants Christmas nail designs with a deep forest mood instead of bright candy colors.
Image Credit: jlovely12
13. Burgundy Tips, Gold Trees, and Winter Berries
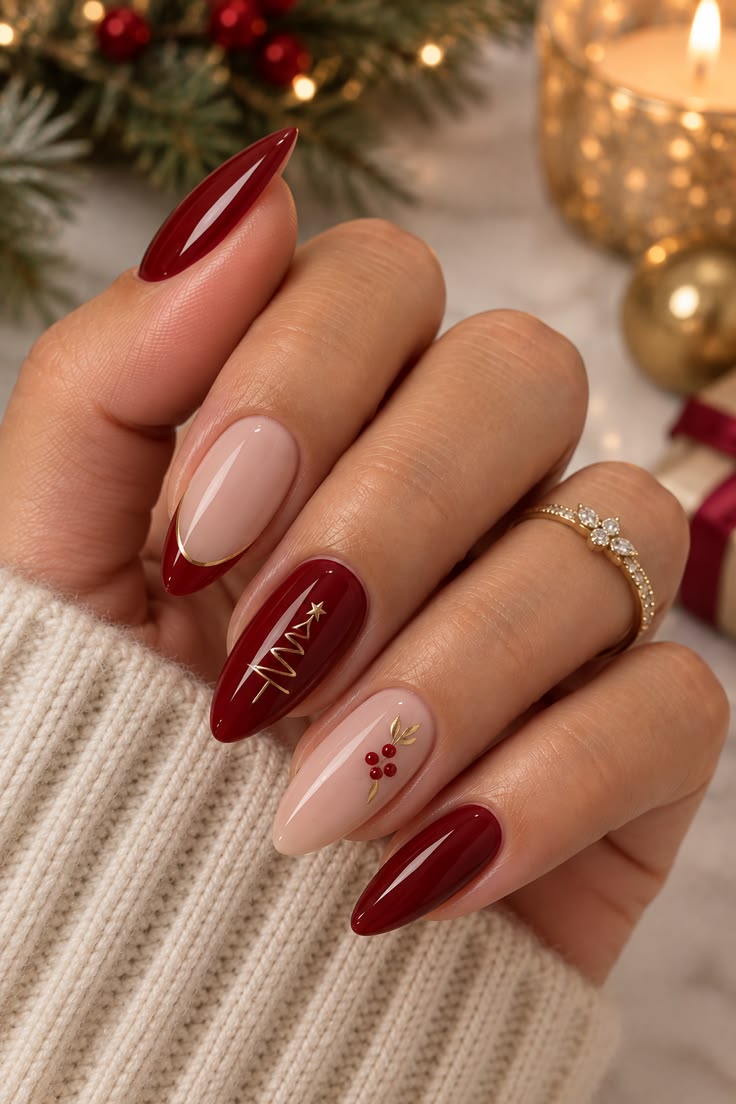
Find my burgundy sweater on Amazon →
This set balances rich burgundy with sheer nude polish and small gold Christmas details. Several nails are fully painted in deep wine red, while the nude nails carry a delicate gold Christmas tree, tiny red berries, and a fine red French tip. The design feels neat and graceful, almost like a holiday version of a classic French manicure. A thin gold line at the edge adds just enough shine without covering the soft base.
The nude background makes the little tree and berry details easy to see. It also gives the manicure a lighter overall feel, so the deep burgundy does not dominate every finger. The tree is drawn with simple gold lines instead of a large filled-in shape, which keeps the set wearable and elegant. The berry accent adds a tiny pop of color and ties the nude nails back to the burgundy ones.
This is a nice design for someone who wants Christmas nail art that can move from the office to a dinner party. It is festive, but it does not compete with clothing or jewelry. The almond shape makes the French tip look slim and lengthening. If your nails are short, use a very narrow burgundy tip and a single berry branch instead of a full tree.
Application suggestions:
• Use a sheer pink base that matches your natural nail tone.
• Paint the burgundy tips with a French guide for a clean curve.
• Add a thin gold outline just inside the red tip.
• Use a dotting tool for three berry circles and a liner brush for the leaves.
The design is also easy to personalize. Replace the tree with a tiny star, ornament, or sprig of holly. A matte nude base would create a soft contrast with glossy burgundy tips, while a glassy top coat gives a more traditional salon finish. Make sure the gold artwork is fully dry before applying top coat, or the fine lines may blur. The berry dots should be small enough that they do not become raised bumps. This is one of the most versatile Christmas nail designs in the collection: polished enough for a formal event, simple enough for everyday wear, and colorful enough to feel like the holidays have truly arrived.
Image Credit: PiperBeautyShop
❝ Christmas nail designs don’t need to sparkle on every finger. Pair burgundy tips with a sheer nude base, then add one tiny gold tree and red berries for a polished, wearable holiday look.
14. Cozy Cocoa Reindeer Sweater Nails
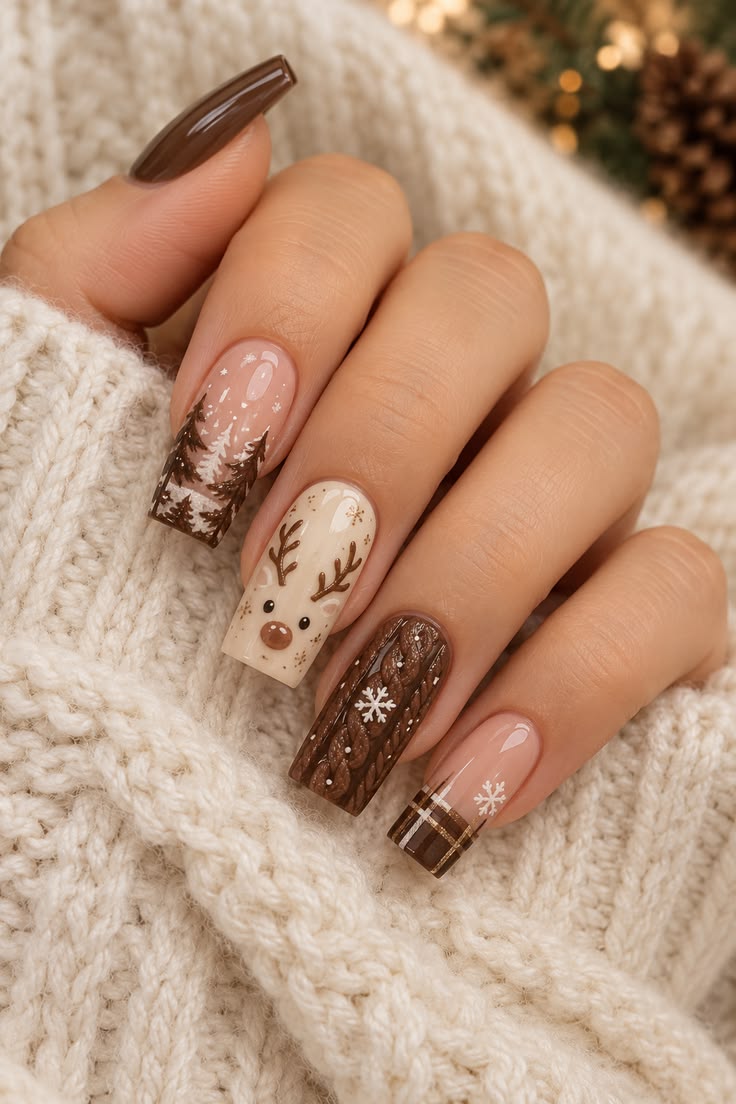
Find my cozy cocoa reindeer sweater on Amazon →
These nails look like a warm winter sweater translated into nail art. The palette uses cocoa brown, cream, taupe, and soft pink, with cable-knit lines, plaid accents, tiny snowflakes, pine trees, and a friendly reindeer face. One nail has a reindeer with a round brown nose and little antlers, while another carries a textured sweater pattern. The whole set feels calm, cozy, and a little nostalgic.
This is a lovely break from the usual bright red Christmas look. Brown tones make the manicure feel earthy and wearable, especially with cream knits, camel coats, and soft neutral clothes. The cream nails brighten the set, while the dark brown nails add depth. Small white snowflakes and pine branches keep the theme clear without making the design feel too busy.
The sweater texture is usually made with raised gel lines. A nail artist can pipe thin diagonal cables over a brown or cream base, then cure them before adding another layer for extra height. If you prefer a flat manicure, use a stamping plate or draw a simple knit pattern with a liner brush. The reindeer face should be kept large and simple so the expression remains clear. Tiny black eyes, a brown nose, and two curved antlers are enough.
Ideas for making it your own:
• Add a red scarf or nose to bring in one traditional Christmas color.
• Use matte top coat on the sweater nails and glossy top coat on the plaid nails.
• Choose a chocolate brown base for a richer cocoa effect.
• Keep the reindeer on one accent nail so the set stays stylish.
Textured art can catch on hair and clothing, especially if the gel lines are too tall. Ask for a smooth sealing layer or keep the raised details low. Matte polish may also show marks more easily, so hand cream and gentle care help keep the finish fresh. The square shape shown suits the cozy pattern, but rounded or almond nails can use smaller designs. This is a fun festive manicure for sweater-weather days, family gatherings, and holiday movie nights. It feels handmade in the best way, like a favorite knitted jumper with a little Christmas charm stitched into every detail.
Image Credit: Sturning_Style
❝ Not every Christmas manicure needs bright red glitter. Choose cocoa, cream, and taupe for cozy Christmas nail designs, then add one reindeer, cable-knit accent, or tiny snowflake to create a calm, nostalgic look.
You Might Also Like


15. Bordeaux French Tips with Golden Snowflakes

This manicure gives the French tip a deep holiday makeover. Instead of white, the almond tips are painted in glossy bordeaux, with a slim gold line tracing the edge. The sheer pink nail beds keep the look clean, while tiny gold snowflakes and starbursts add small points of light. A few nails are fully burgundy, which makes the French tips feel even more noticeable and gives the set a rich, balanced rhythm.
The design is elegant without being plain. The gold border adds a jewelry-like finish, and the snowflake art is delicate enough for a formal event. Because the natural-looking base takes up most of the nail, the manicure also grows out more gently than a full dark set. It is a smart choice if you want classy nails that still show clear Christmas spirit.
For the perfect French tip, the nail shape matters. Almond or oval nails help the bordeaux curve look smooth and even. Use a thin liner brush to outline the smile line, or ask for a gel French tip if you want a very crisp edge. Once the red is cured, the gold line can be added with striping polish. It should be narrow; a thick gold border can make the tip look heavy.
Details that make a difference:
• Use a sheer blush base instead of opaque beige for a natural glow.
• Place one snowflake near the lower side of the nail rather than directly in the middle.
• Add a tiny crystal at the center of one snowflake.
• Choose antique gold for a vintage mood or bright gold for extra shine.
The fine art will last longer under a quality top coat, but be careful not to flood the cuticle area. If the top coat shrinks away from the tip, the gold line can chip first. Sealing the free edge is especially important on long nails. The bordeaux shade looks beautiful with gold rings and winter whites, but it can also be dressed down with denim and a knit sweater. This is a refined festive manicure for people who like holiday details that whisper rather than shout. It is simple, warm, and very easy to save as a salon reference.
Image Credit: therosyeditdaily
16. Short Cherry Nails with Gold Snowflake Accents

Find my cherry sweater on Amazon →
Short nails can look just as festive as long extensions, and this set proves it. The manicure uses a glossy deep cherry color on most nails, with a few accent nails decorated by gold snowflakes and a small touch of glitter. The compact shape keeps the overall look neat and practical, while the rich color gives it enough holiday depth. It is the kind of manicure that works when you want seasonal style but still need to use your hands all day.
The gold snowflake accent is kept fairly large and simple so it remains visible on the shorter nail. A tiny crystal or gold dot in the middle makes it sparkle without needing a full collection of gems. The solid cherry nails provide a clean background for the details, and their shine makes the whole set look fresh. This is a good option for people who prefer low-maintenance Christmas nail designs but still want something more than plain polish.
Short nails benefit from careful shaping. A soft square or rounded-square shape follows the natural nail and helps prevent corner breaks. Keep the polish slightly away from the skin around the cuticle, then clean the edges with a small brush for a professional finish. The gold artwork can be painted with a detail brush or applied as a thin decal. Avoid very thick snowflakes because they may make the nail look crowded.
Easy ways to adjust the look:
• Use classic red for a brighter holiday mood.
• Add fine gold glitter only to the ring-finger nail.
• Choose silver snowflakes for a cooler winter effect.
• Paint a single snowflake on the thumb so it shows in photos.
The short length is also useful for anyone who finds long nails uncomfortable during gift wrapping, cooking, or travel. Dark red polish can stain, so a strong base coat is worth the extra minute. Reapply top coat after a few days to bring back the shine and protect the gold art. If one nail chips, it is easy to repaint without rebuilding extensions. This design is proof that festive manicure does not need to mean complicated. It has the classic color, a little sparkle, and a clean finish that looks lovely with cozy sweaters and gold jewelry.
Image Credit: Sturning_Style
17. Tiny Christmas Characters and Wrapped Gifts

This is the most playful set in the group, packed with tiny holiday characters and gift-inspired details. A snowman wears a red hat and scarf, a reindeer has a shiny red nose, one nail looks like a wrapped green present with a bow, and another shows a miniature Christmas tree inside a decorative frame. Candy-cane stripes, holly, gold dots, and little white snowflakes fill out the story. It feels like opening a box of favorite Christmas decorations one nail at a time.
The clear or nude sections help the busy artwork stay readable. Deep red and green provide the main color blocks, while white and gold add contrast. The designs are detailed, but each nail has one main subject, which stops the set from becoming a blur. This style would be perfect for someone who loves novelty nail art and does not mind people asking for a closer look.
Because the characters are small, this manicure is best done by an experienced nail artist or with high-quality decals. A very fine brush is needed for faces, scarf lines, antlers, and tiny tree ornaments. Raised gel, pearls, and little charms can add dimension, but they should be placed where they will not catch on clothing. A thick but flexible top coat can protect flat art, while larger 3D pieces should be sealed around the base rather than covered completely.
Tips for keeping the set cute instead of crowded:
• Give every character a clean, open background.
• Repeat the same red and green shades across the nails for harmony.
• Use gold dots as decoration when there is no room for another picture.
• Keep the thumb design larger because it has the most space.
This style may not be the easiest for everyday tasks, especially if it includes raised charms. It is also more expensive and time-consuming than a simple polish set. Still, it makes a wonderful holiday statement and looks fantastic in close-up photos. If you want a toned-down version, choose only one character, one gift nail, and keep the remaining nails red glitter or sheer nude. The result will still feel cheerful. These Christmas nail designs are for the person who wants the manicure to tell a story and bring a bit of childlike holiday joy to every hand gesture.
Image Credit: modessa830
18. Frosted Evergreen Branches on Sheer Pink
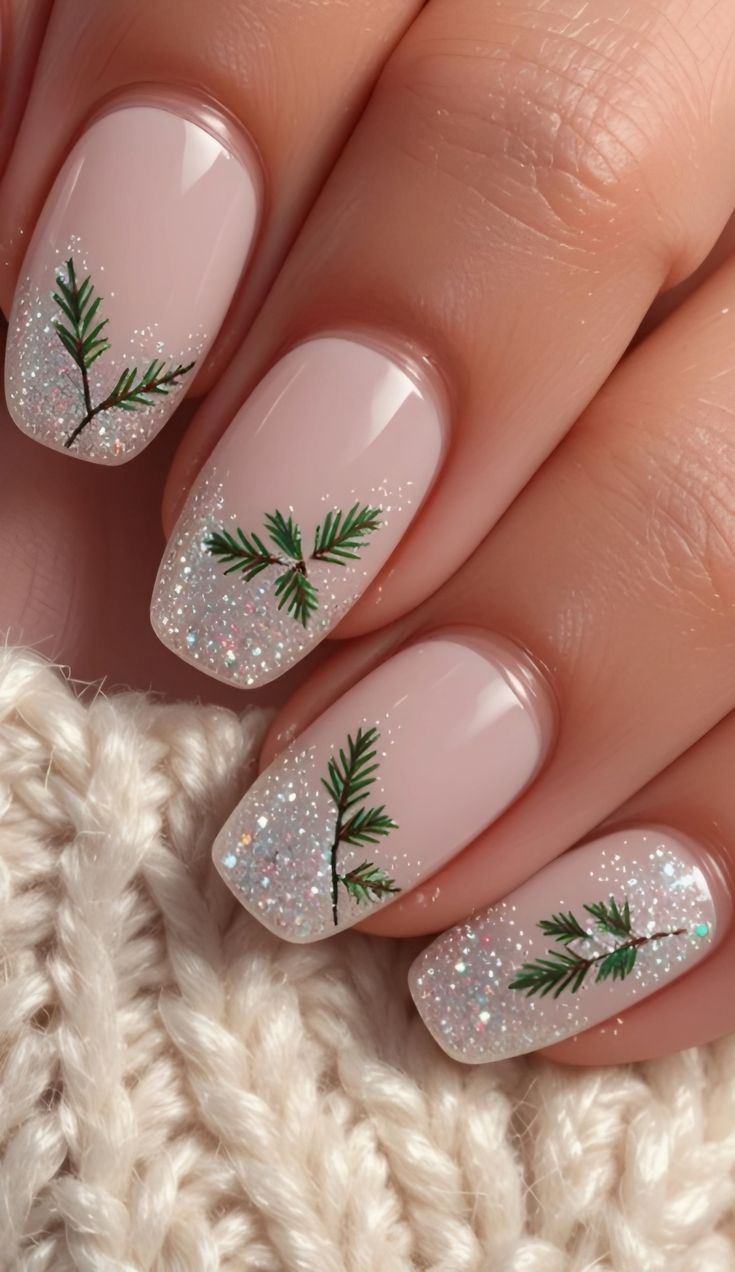
Find my sheer pink sweater on Amazon →
This design is soft, airy, and quietly beautiful. A sheer pink base lets the natural nail show through, while fine evergreen branches stretch across the tips and tiny silver glitter creates the look of fresh frost. The branches are painted in deep green with delicate brown stems, so they resemble little pieces of pine rather than cartoon trees. The glitter is concentrated near the lower edge, making each nail look like it has been dusted with snow.
The short rounded shape makes the manicure feel clean and modern. It is a good choice if you want Christmas nail art that does not take over your whole look. The pale pink base works with almost any outfit and creates a soft contrast against winter whites, creams, and gray knits. The tiny evergreen details are seasonal but subtle, so the set can remain attractive after Christmas Day.
For the branch art, use a very thin brush to draw one slightly curved stem. Add short green strokes that angle upward from each side. They do not need to be identical; natural branches are not perfectly even. A touch of dark brown at the base gives the branches depth. The glitter can be applied with a sponge or a small brush, fading it upward so it looks scattered instead of sharply blocked.
Ways to personalize this delicate look:
• Add one tiny red berry to each branch for a traditional Christmas touch.
• Use icy blue glitter instead of silver for a cooler winter mood.
• Choose a milky white base if you want more contrast.
• Add a matte top coat over the pink and leave the glitter glossy.
The sheer base may show ridges or stains, so gentle nail prep is important. A rubberized base coat can smooth the surface before the pink layer. Keep the branches fine; thick green lines can make the nails look heavy. This design is also a good option for shorter nails because the branch can sit along the tip without needing a lot of space. It is less flashy than full glitter, but the shimmer still catches the light in a lovely way. For a soft festive manicure with a snowy woodland feel, this one is hard to improve.
Image Credit: nailglowlab
19. Red Glitter Micro-French Tips
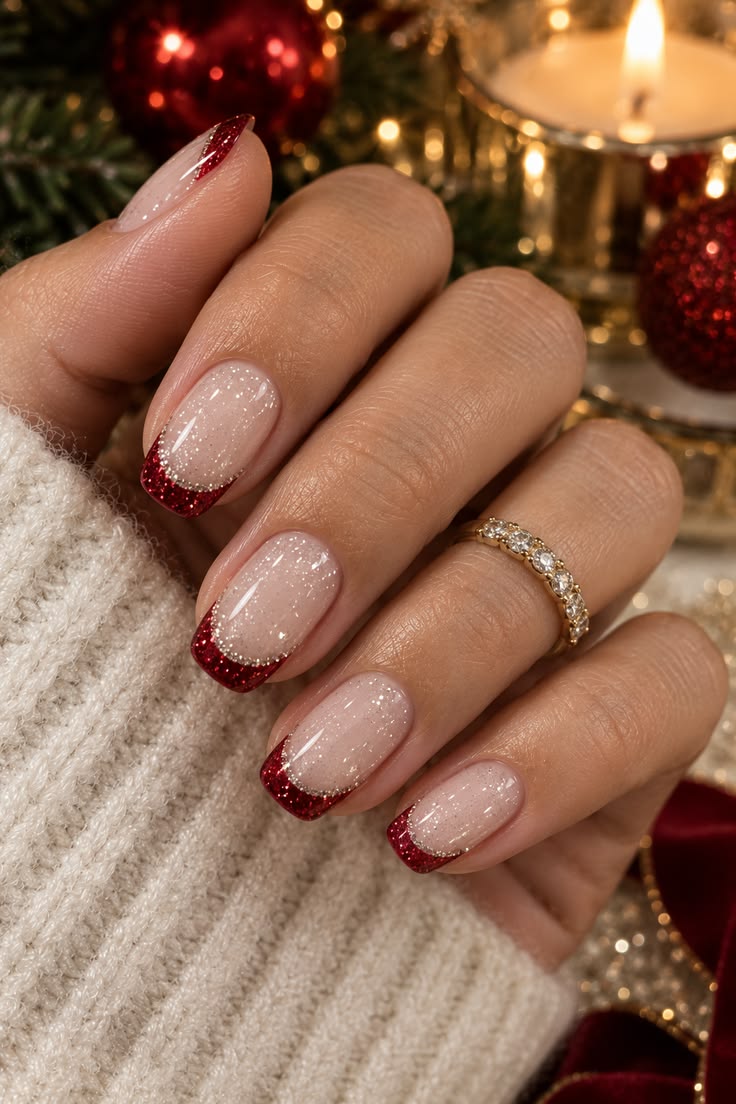
Find my red glitter sweater on Amazon →
A micro-French manicure gets a holiday upgrade with fine red glitter tips over a sheer nude base. The glitter line is slim, curved, and bright enough to look like a tiny strand of tinsel along each nail edge. A delicate silver or gold outline may be added just below the glitter, giving the tips a crisp, jewelry-like finish. The rest of the nail stays clean and glossy, so the result feels simple, elegant, and festive.
This is one of the easiest Christmas nail designs to wear for more than a few weeks. It does not rely on a large snowflake, character, or seasonal picture, so it can move from Christmas parties into New Year celebrations without looking out of place. The sheer base also makes natural growth less obvious. It is a great option if you want classy nails with a little sparkle but do not want a full glitter manicure.
The French line needs to be thin and even. On longer nails, the red glitter can follow the natural curve of the tip. On short nails, a tiny straight or softly rounded line may look cleaner. A French brush or guide sticker helps create the shape, though a detail brush dipped in glitter gel can give a more delicate result. Apply the glitter in thin layers and cap the edge with top coat so it does not catch on clothing.
Useful salon notes:
• Pick a sheer pink or milky nude that suits your natural nail color.
• Use fine red glitter instead of chunky pieces for a smooth micro-tip.
• Add a very thin gold line only if you want more contrast.
• Keep the thumb tips slightly wider so the curve remains visible.
The biggest mistake is making the tip too thick. A wide glitter band can shorten the nail and turn the look into a regular French manicure. Another issue is patchy glitter coverage, which can be fixed with a small sponge or a second light layer. A glossy top coat will make the red sparkle look richer and help smooth the surface. This festive manicure is perfect for someone who likes clean beauty, understated holiday details, and nails that look polished with every outfit. It is proof that sparkle does not always need to shout.
Image Credit: asmaimrankpk82
20. Soft Mistletoe Nude Nails
Find my nude sweater on Amazon →
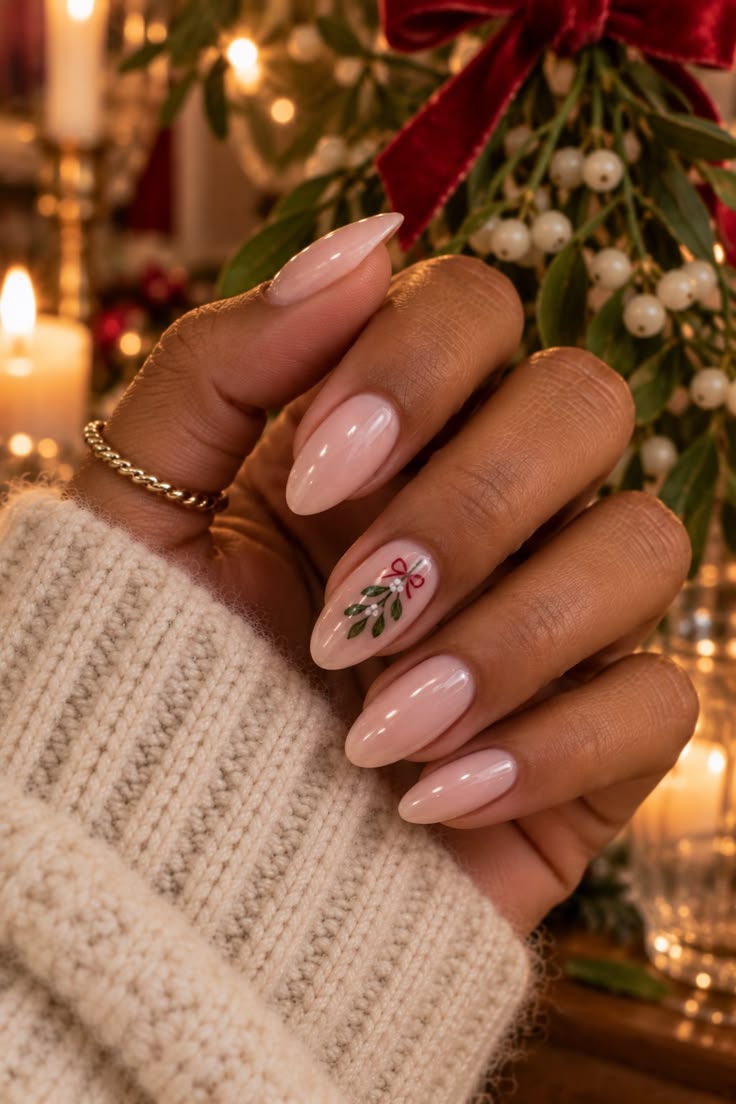
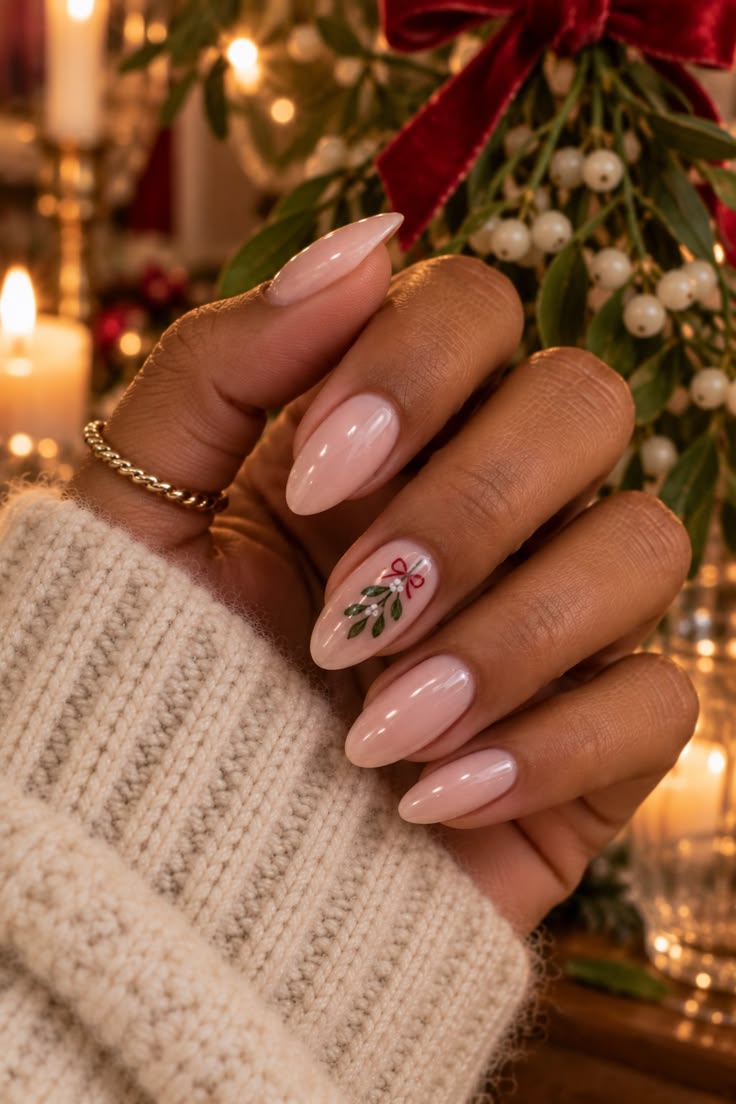
The final look keeps things sweet and simple with glossy nude nails and one tiny mistletoe accent. Most of the nails are painted in a soft milky pink, while the feature nail has a small green branch, a few white berries, and a delicate red bow. The design is romantic, understated, and easy to wear, making it a lovely choice for someone who does not want full holiday art on every finger.
Mistletoe is a gentle Christmas symbol, so the manicure feels seasonal without relying on glitter, snowmen, or bold red polish. The oval shape gives the nude color a clean, feminine finish, and the high-shine top coat makes the natural-looking base appear smooth and healthy. One decorated nail is enough to make the theme clear, especially when the branch is placed near the center or lower third of the nail.
For the accent, the artist can paint a slim green stem with two or three small leaves. White berries work well against the nude base, while a tiny red bow adds a festive point of color. If painting is not your strength, a small mistletoe decal will give a clean result. Keep the design small and leave plenty of open space around it. That blank space is what makes the look feel refined.
Easy ways to change it:
• Use gold berries for a more glamorous holiday style.
• Add a faint pearl shimmer over the nude base.
• Replace the red bow with a tiny gold star.
• Put mistletoe on two accent nails for a little more detail.
A nude manicure shows marks and uneven texture more easily than a dark color, so smooth preparation matters. Use a ridge-filling base coat if needed and apply thin, even layers. Keep hand cream away from the nail plate before polishing so the color adheres properly. Because the design is flat and simple, it should be easy to maintain at home. This is a beautiful everyday festive manicure for dinners, office celebrations, winter dates, and quiet Christmas mornings. It proves that Christmas nail designs can be soft, classy, and still full of holiday feeling.
Image Credit: womanstyledaily
A Festive Finish for Every Holiday Mood
From tiny mistletoe branches and micro-French tips to bold snowmen, plaid, glitter, and glowing burgundy polish, these Christmas nail designs offer something for every style. Choose a simple accent if you want classy nails, or pile on the sparkle and characters for a manicure that becomes part of the celebration.
Save the designs that match your holiday mood, then show your nail artist the details you love most.


